Wednesday, 28 October 2015

Our Group's Concept Proposal


The morning was very slow as I didn't get to bed in time I went to bed at 12 instead of 11 which is the time I usually go to bed around. So I wasn't on the ball as I normally was I had Lauren at my side to help me though which was good. The group I was in consisted of Grace, Mimi and another girl who I couldn't remember the name of. We were given the task of coming up with a collection of something we liked so from yesterday our group chose to base our collection of seasonal birds. So we brain stormed some ideas of how we could present our collection as a group. I had a cool idea of making a tree that was central and had all our birds on. I got this idea from some posters I saw in some gift shops in Zoo's. Along with this idea I had the thought of different drink flavors of a certain brand and the way they're all arranged on posters and adverts. However this other girl had a different idea of how to present our theme of seasonal birds instead she suggested having a box with our own each individual bird inside. 

Our groups theme was based on Seasonal Birds this varied from Autumn, Winter, Spring, and Summer. As a group we had brained stormed our concept idea, Which was to create our own each individual Seasonal Bird depending on what season we chose. Our original plan was to put them all on a tree (a family tree of birds) which would be medium sized. Our display would demonstrate a sense of position and variety and shows that as a group we've been collective.  

That morning we got given some cameras that we were going to use to take some pictures of the birds and wildlife around us in the park. I knew straight away which one to go to. I went to the Tothill Park as it was close and there was lots of space to roam around and take pictures of the wildlife. 

Our group decided to change our original idea due to our 3D box project. So Instead we made our own each individual tree where we put our bird on. I made a castle where I made a tissue paper parrot to put inside my box. I only had a certain amount of time at the end to add the finishing touches i.e the blossom. The other thing was to make it look summery. So I added some more artificial grass (Sponge). 


This was the outcome I had... 


Our 3D Boxes

THE FINAL OUTCOME OF OUR PROJECT

For this last session before half term we were finishing our 3D boxes which we were then going to be presented for show and tell.This gave me time to complete the grass I had made inside my castle box That I had constructed. I had used the ruff side of a sponge (used to scrub dirt) to use as grass.I had also completed a model parrot that I had finished at home, I was well under way of completing my project. Unfortunately I didn't quite get round to completing the tissue papered bottle that was going to be my side tower in my castle.


It was then time for show and tell and our group had put on a lovely display of our final pieces. We had used some long dark green leafs to cover parts of our display so it was more hidden like a jungle. By using the leafs we also made it seem more adventurous to the eye. The project we had chosen was on birds. Grace a member of our group chose to do paper birds for her project where she had used some wire to create her tree that she put her paper birds on. Another member of our group had made a paper tree with her own cardboard birds she had made, She said "it took her 3 hours to try to work out how to make them" by the end they looked stunning. along side that she made a box that she put them in. Grace's friend for her project she had a box that she had made during Lucy's lesson in the wood tech room, where she used spray painted wire for her tree. She left the left side of her box missing where she had weaved wire together for the trees roots inside the box. 


Our groups final outcome for Show and Tell.


A person from another table had her rectangular box with painted squares on the side. Which was the first thing that caught my eye as i was exploring the table they're multi colored squares reminded of Elma the elephant.They're theme seemed to be a soft child like box with Plasticine characters inside.They had used soft balls of Plasticine to use to represent their theme of playfulness.
 

Another group cross the room had made a castle using different 3D resources to make it look as 3D as possible. They had put minefield warning signs up in parts where they wanted to label. They had also used wire to promote the theme of darkness and danger. Also making the outside walls grey and black to create that old fade in brick work. 


This group had a box with Real Butterflies on the outside of the box along with a back covering for their box. They had delicately pinned the butterflies to their box using long pins, they said that before they applied the butterflies they went hunting for butterflies to add to their collection. 


Another group made a pyramid made from paper, inside they had mini compartments where they kept their collective mini items. They did this by cutting square holes on each side of the pyramid. For each item they painted the side of the pyramid to fit the collective item they had chosen. 


Now this group decided to expand their piece and they made a wired Cob-Web using wire and a glue to stick the joints together. Their theme was based on bugs and wildlife insects where they made small paintings of their bugs on card and they put along side their piece. They had even created a jungle of leaves. 

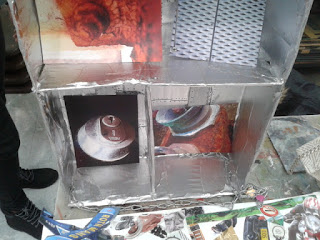
This group (by looking at the photo) you can see that they were much more expandable with their box shape, they had made a diamond shaped inside to their box with four quarters. Their chose of color was very iron aged (silvery). 

Similar to this group where for their box they had a silver covering with photographs stuck inside for presenting their theme by the image they had chosen they looked like they were becoming more textured like in their work. 

This group had made a diamond shaped box with circle with iron and metal objects inside. They covered the box with newspaper which worked well in my opinion as it brought out the boxes shape. They also made a bottle top necklace or chain along side some etchings and colleges of their bottle/can theme in their sketch book. 


Here are some other pictures I took of other peoples work in the studio.


Wednesday, 21 October 2015


Card Board Structures


For our next project which was to create a card board either castle or box I had taken some inspiration from other candidates in the class room, I found that creating my box into a castle was going to be easiest so i went with that idea.

At first I was finding the shape to be UN-castle-like so I decided to leave the castle wall idea out of the plan, closely followed was my idea of covering the wall with tissue paper to paint over afterwards. I found this helped later on when it came to painting the castle walls.

The next lesson was all about coming up with different ways of decorating our boxes, I struggled at first because I was behind with covering my castle in Tissue paper but Lauren my teaching assistant reassured me that I wasn't the only one on the covering our box with newspaper idea. Dave our classroom teacher was going around giving people some inspiration to help them boost their pieces, I could see he was giving us all lots of advice of how to decorate our boxes.

I was just in the middle of decorating the inside walls when Dave observed my castle, He said he thought the choice of paper covering was a good way to make it more interesting to the eye, closely followed by that he suggested that I'd use "the green top bit of the washing up sponge" to use as grass and moss to cover the walls with.

So that evening I sat at home filling in the inside of my box covering it with the left over tissue paper (Luckily I didn't run out) this was going to be a good chance to decide what to cover the floor of my castle with. I decided to use some "Red Tissue Paper" to cover my box floor with this worked well as it brought a slightly royal presence to the structure.

The next day I was sat in my room listening to my music when I remembered that my castle was not yet complete, I had a clear plan in my head of what to do to improve the castle. So that evening when the dining room table was clear I brought down my castle to continue decorating it, I brought down my selection of paints that I'd used before and began mixing some of the paints together to create new colors. I came up with a Golden Yellow color and used it to paint the outside of the castle. I then took a look back at my work when I had finished I thought it needed more detail of it being a castle, so I filled in the parts with bricks and covered some parts in the green cleaning part of sponge for the grass.

Thursday, 8 October 2015


Final piece 

My final piece was a Pencil Sharpener Rubber that I had made and designed using bin liner and polystyrene shavings. During this process I had found the sticking the polystyrene on plus the bin liner the hardest part I also found that by the end it was quite flimsy and felt like it could of been stronger. 


Tessellation 


For the next task we had to choose a special object. So off I went  home to search for that special object. At first I knew what I was going to bring, however I hadn't remembered that it was for the next wood tech lesson with Tweeney. A week had gone by and it was the wood tech lesson with Tweeney everyone around seemed like they knew what they were doing, I found the start slow as I couldn't find my sheets that I had from the last lesson. So Lauren helped me look for them I felt like I was behind on my project, Lauren eventually found the sheet I was meant to have out in front of me. She reminded me about the special object concept, But I'd completely forgotten to bring my special object that was a toy airplane I had since I was small. I had always remembered holding it in my hands when I was in the car driving to places. The way the way it's wings would flap as I'd rolled it along the floor. I never really payed much attention to it's colors as it never dawned on me as I was perhaps to young to realize.

The colors were navy blue with white windows that now looking back on it seem very dream like. The wheels were yellow with a red circle in the middle. It used to make this sound as you rolled it along the floor. 

However to my horror I had forgotten this object of pride. It was to my disappointment that I'd only to turn to my pencil case as a resource of finding my special object. Lauren my teaching assistant gave me some advice as to what to do, she suggested to focus on the shape and pattern for an example She used was my pencil sharpener rubber she explained about how all the sides joined up together to make a tessellation pattern. She then suggested taking parts of the sharpener to create a pattern. I tried the idea on paper and it worked, we even cut out parts of the tessellated pattern and joined it up. 

We were then given a task which was to convert our pattern onto different materials such as wood and plastic and other resources we could find. Typically I chose wood and I drew my shape onto the wood as it was strong and was going to last. The outcome was like this.. 


We then got given homework where we had to come up with different types of tessellated patterns such as patterns made from metal and polystyrene. It was the last lesson before we brought our tessellation project to an end and I didn't have any ideas, in fact I didn't even do any research in what ideas hadn't been tried before. I was stuck as to what I could do.. But to all my worries I couldn't help notice that Lauren my TA was playing with some pencil shavings whilst I was lost in thought, I knew she was trying to get something across to me but I didn't know what. She told me her idea of the tessellation shape being made of wood and the shavings from the a pencil being made of wood which comes from trees. She then hinted the fact that trees our nature is being cut down. The idea she was trying to convey to me was covering the tessellation shape with pencil shavings. 

The process was quick and easy it even got people intrigued, along with the tessellation I made 3 others that were equally as good this included a metal one with chipped patterns along with a polystyrene one with a wood shaving cover including a plastic tessellation filled with balls of polystyrene.